
(Photo Credits to Google.com)
Why use regular lipstick that is toxic and expensive, when you can use 100% nontoxic crayons for lipstick? It may sound kind of sketchy, but don’t worry. Nothing bad will happen to you or your lips. Using crayons are more efficient because you know exactly what’s in it and like I said before its nontoxic, you get more use out of your money too which is pretty great!
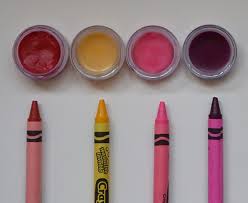
The materials and ingredients you will need are Crayons (any color), something to take the paper off of your crayon(s), your stove, a sauce pan, water, a big metal mixing bowl, stirring utensil, petroleum jelly or shea butter, a fork, oven mitts, empty tube or container , a knife and your fridge.
Step 1: Take off the paper from the crayon; you should cut off any part of the crayon that was not covered from the paper. The reason why is because the non- covered parts may have germs and bacteria, it also may have been tainted by other surrounding colors.
Step 2: Turn on your stove to the highest heat and wait for the burner to heat up.
Step 3: get out your sauce pan and fill it up half way with some water, add a pinch of salt to make the water boil faster.
Step 4: When the stove is ready take your sauce pan and put it on one of the burners. Wait until the water starts to boil. After it starts boiling put the heat on low-medium.
Step 5: Get out your metal mixing bowl and place it on top of the boiling sauce pan. Make sure the water doesn’t touch the bowl if it does pour some water out. This will serve as a make shift double burner, if you have a double burner then use that instead.
Step 6: Pick the base shade you would like to use, I advise a red or pink. ONLY USE THE BASE COLOR CRAYON ONCE
Step 7: Later on add more crayons. I advise you to use half crayons or even tiny pieces. Don’t be afraid to add colors that are not traditional lipstick colors like blue and yellow. Colors like maroon could be used to darken the shades. Colors like peach and nude will make the shade less intense.
Step 8: Stir the crayons until they are completely melted as in no chunk what so ever. Using a fork may be easier.
Step 9: Turn the heat to low, add petroleum jelly or shea butter with the fork. Stir until al the ingredients are completely melted and mixed together. The more petroleum jelly and shea butter you use the easier it will be to apply your lipstick.
Step 10: Remove the bowl from the heat when all of the mixtures are combined USE MITTENS THE BOWL MAY BE HOT. Shape the lipstick directly into the empty tube or container. A contact lens container may be for convenient because you can carry two shades at once. Use a knife or even your fingers to shape the lipstick.
Step 11: Give the lipstick a chance to solidify, place it in the fridge for 3-8 hours.
Step 12: take it out of the fridge when the times up and try it on!
I have not yet tried this DIY because of the simple fact that I don’t wear makeup. If I did wear makeup I would defiantly try this DIY. It’s a money saver, who would not want to try this?!
Shanyce Hewitt is a junior and a second year Journalism student
Shanyce babysits in her free time.
Shanyce likes to draw, go camping, listen to music,...